
This is a small test of how to integrate the chatGPT / OpenAI GPT3 (in this case text-davinci-003) models into a Gradio application running on a virtual server in Hugging Face Spaces. Best of all, 90% of the application was generated directly by OpenAI CODEX 😉.
Demo ChatGPT
Prompt OpenAI CODEX for Gradio
OpenAI configuration
First of all, you need an OpenAI account. You can get it here (OpenAI Sign up). You will be assigned a credit of $18 for the first tests. Then it’s paying. I also leave you the pricing page. We will use the code-davinci-002 engine to generate code which, for now, is free since it is in beta mode.
After registration, you will have to create an API-Key to be able to call the OpenAI engine from an external application. Here is the API Key menu where to do it. Be careful, write it down well because it is not possible to view it later, only to delete it and create a new one.
Once you have everything correctly set up, you must go to the Playground and modify these parameters:
- model = code-davinci-002
- temperature = 0 (this is the default value for generating code)
Prompt for OpenAI CODEX
Now you can launch the requests for OpenAI CODEX to generate code based on natural language. Here is the request I used for this demo. You can copy it directly into the Playground and click on the [Submit] button.
# python3
# build a demo for OpenAI API and gradio
# define the "api_call_results" function for the gradio interface as a single text input (prompt).
#    - Do not include any examples
#    - live = False
#    - for OpenAI API Completion method:
#        - engine="text-davinci-003"
#        - params: max_tokens, temperature and top_p


import gradio as gr
import openai
import os
import re

# openai API key
openai.api_key = os.getenv
I told you it was 90%, not 100% and never perfect (or almost never):
- The main request is in the first two lines of comments
- By indicating the “import”, I make sure that the code that will be generated will use those libraries that we will later take to Hugging Face Spaces.
- I also show you the way to take the OpenAI API-Key from the environment variables as a way to protect that key from being copied. In Hugging Face it will be configured as a Secret (see below).
Generated code
One observation, even if we set the temperature = 0, the OpenAI CODEX model is not completely deterministic, i.e., it does not always respond with the same result: sometimes it repeats code or even generates meaningless code. That’s why it needs to be checked 😉.
# python3
# build a demo for OpenAI API and gradio
# Define the "api_call_results" function for the gradio interface as a single text input (prompt).
#    - Do not include any examples
#    - live = False
#    - for OpenAI API Completion method:
#        - engine="text-davinci-003"
#        - params: max_tokens, temperature and top_p


import gradio as gr
import openai
import os
import re

# openai API key
openai.api_key = os.getenv("OPENAI_API_KEY")

# define the function for the gradio interface
def api_call_results(prompt):
    response = openai.Completion.create(
        engine="text-davinci-003",
        prompt=prompt,
        max_tokens=50,
        temperature=0.7,
        top_p=0.9,
    )
    text = response["choices"][0]["text"]
    return re.sub(r"\s+", " ", text)

# define the gradio interface
iface = gr.Interface(
    fn=api_call_results,
    inputs="text",
    outputs="text",
    live=False,
    capture_session=True,
)

# run the gradio interface
iface.launch()
Comments to the generated code
- First of all, before we had no idea how to generate a call to OpenAI or how the Gradio library worked, and now we have code that we can review. Time used from the prompt: 15″
- The better we describe (and know) both the application and the components that define it, the better the final result will be. That’s why I try to give you as much detail as possible in an orderly fashion.
- It is necessary to review the final code because there are details especially related to the versions of the libraries in which the model has not been trained:
capture_session = True> must be eliminatediface.launch()> although the code is correct to be able to execute it in Colab, when we take it to HF Spaces, we will have to add the parameteriface.launch(inline=False).
- There is a secondary outcome that we are not directly taking into account: it puts us on the thread of learning much faster and with more focused objectives.
Test in Colab
Now that we have code, let’s check that everything is ok using the IDE that you like. I usually use VS Code on the desktop but Colab is also interesting because it gives us everything we need without having to install anything on our computer.
Once we create a new notebook in Colab, we have to install the openai and gradio libraries in the environment to be able to use them.
pip install gradio==3.15.0
pip install openai
After instantiating them, we create another code cell and paste the result returned by OpenAI CODEX. To avoid problems and since it is only for testing purposes, we replace the line where we include the OpenAI API Key.
# openai API key
openai.api_key = "sk-XXXXXX"
And if all goes well, you will have something very similar to this:
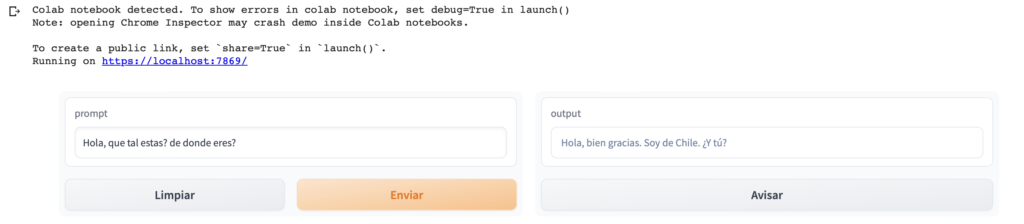
As you can read in the run notes, if you add the share parameter to launch, you will have a link that you can share for 72 hours: iface.launch(share=True).
Remember that for the API of the application, we are using the payment model
Forward-thinking developer dixittext-davinci-003so you could incur unwanted costs if there are many executions or you share the link without control.
Hugging Face Spaces
It’s time to take the generated code to Hugging Face Spaces so we can run it persistently and embed it in our static web page (like this one). To do so, first create an account here.
Once you are registered on the platform, go to your profile and create a new Space. You will appear in a form like this:

- Space name: the name you like the most. It will appear in the URL when the space is public.
- License: this is a world of its own but I usually choose CC-BY-NC-4.0 (Creative Commons, Attribution and Non Commercial).
- Select the Space SDK: Gradio
- Select the Space Hardware: tier-free is OK.
- Public/Private: Whatever you prefer, although you can always start in Private and when you have it finished and working, you can switch it to Public.
When you have it already available we are going to create two files in the Files and Versions tab.
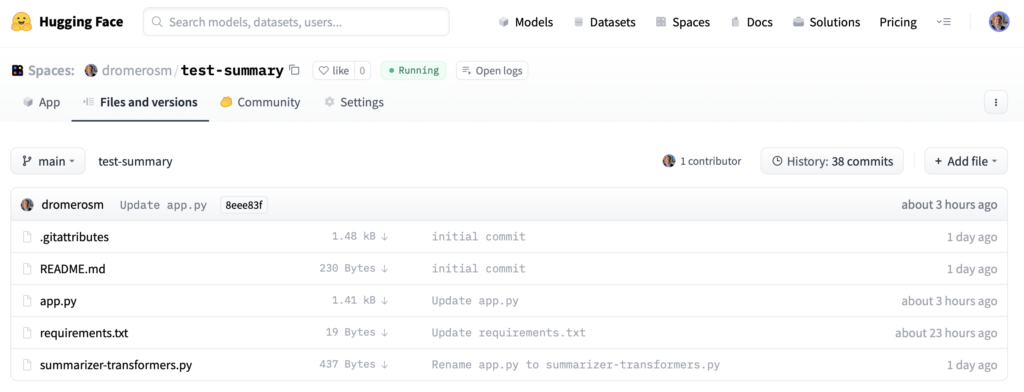
- first, the dependency file (
requirements.txt). This is where we will tell HF Spaces which libraries to install in the environment in order to import them into the code.- Create a new file (+ Add file)
- Add two lines with openai and transformers (this is not necessary but you have it in case you want to use it with more complex NLP applications).
- You make a
[Commit changes to main]with the button at the bottom.
transformers
openai- second, remember I told you that we were going to protect your API Key from appearing hard-coded? We will do this by defining a SECRET in the Settings section of the space.
- Create a new secret > New Secret
- Nombre > OPENAI_API_KEY (este sera el nombre de la variable de entorno para cargarla en el código)
openai.api_key = os.getenv("OPENAI_API_KEY")
- Value > enter the value of your OpenAI API Key. Once you accept, you will no longer be able to view it, only change or delete it.

- third, the application file (
app.py). Same operation:- Create new file (+ Add file)
- File name: app.py
- Copy the code you have tested in Colab modifying the last line so that Spaces can execute it.
- You make a
[Commit changes to main]with the button at the bottom.
# python3
# build a demo for OpenAI API and gradio
# Define the "api_call_results" function for the gradio interface as a single text input (prompt).
#    - Do not include any examples
#    - live = False
#    - for OpenAI API Completion method:
#        - engine="text-davinci-003"
#        - params: max_tokens, temperature and top_p


import gradio as gr
import openai
import os
import re

# openai API key
openai.api_key = os.getenv("OPENAI_API_KEY")

# define the function for the gradio interface
def api_call_results(prompt):
    response = openai.Completion.create(
        engine="text-davinci-003",
        prompt=prompt,
        max_tokens=50,
        temperature=0.7,
        top_p=0.9,
    )
    text = response["choices"][0]["text"]
    return re.sub(r"\s+", " ", text)

# define the gradio interface
iface = gr.Interface(
    fn=api_call_results,
    inputs="text",
    outputs="text",
    live=False
)

# run the gradio interface
iface.launch(inline=True)
At that time, Hugging Face Spaces will switch to [Building] mode in blue. If everything goes well, and I hope it does, when it finishes it will go to [Running] mode in green and you will have your application running in the [App] tab. If something has failed, you will have a [Runtime errors] and you will be able to see the console log to identify the problem.

Embed your application in a website
Finally, let’s see how you can integrate your application that is hosted on Hugging Face Spaces virtual machines into your website (like this one). Just go to the […] button in the space.

You have three options:

In my case, I have chosen the iframe option to make it responsive within WordPress. Also interesting is the Direct URL option to be able to share it in networks and/or email without having to go through Hugging Face. It will only work if your space is public.
Next steps
As you may have seen at the top of the page in the demo, the one I have included here is a later version of the one I have told you about with some small improvements:
- I have added the option for the user to enter his API Key to avoid the risk of overloading mine. In addition, I have set it to “password” so that the text is masked.
- I have passed one of the OpenAI GPT3 parameters (temperature) to a slider to test interface options.
- I have added labels to the interface to improve its usability.
Could you have done all this with OpenAI CODEX? Yes. Was it worth it? No. Why? Because of one of the points I mentioned before: with this type of tools, training and learning can be enhanced much more, but keeping the curiosity to learn alive is a powerful motivation to continue advancing and deepening.
I hope you found it interesting and useful. Any questions, leave me a comment… and if you want to buy me a coffee, I’ll accept it 😆.

